
I want to pick up where a failed print left off on my Adventurer 5M, but I'm running into the dreaded Timer Too Close (AKA "TTC") error from Klipper, which I know from errors shown on the Fluidd (web) interface instead of just having the system stop printing with no feedback like you get with the stock screen, because I am running the Forge-X mod. I have the Power Loss Recovery mod installed, so there is a checkpoint which records where the print left off. I use OrcaSlicer so that's the other software that's going to be involved in this example. You will need to know the difference between this and your slicer to understand these instructions. I'm also on Linux, and not interested in providing instructions for Windows. There are various environments available for you to have Linux-like commands on Windows, like cygwin.
What?
I tried to use the recovery feature (aka the RESURRECT macro) unsuccessfully, as it goes right back into TTC. Apparently part of the problem is just parsing large files? I tried to gimmick this by editing /opt/klipper/klippy/mcu.py and raising the TRSYNC_TIMEOUT values which I read in some other blog posts, but this didn't help here. But at least I've got the checkpoint file to work with? As it turns out yes, I found it in /opt/config/mod_data - it is called resurrection.json and it knows what you need to know to restart your print:
kunos :: /opt/config/mod_data » cat resurrection.json
{"file_path": "/data/Axolotl_V2_7_Straight_Thick_HiRes 8mm glass eyes_PLA_9h15m.gcode", "file_position": 49213611, "file_size": 62797109, "position": [-74.489999999999995, -91.876999999999995, 16.321804098053484, 54665.732949993646], "extruder_temp": 205.0, "z_offset": -0.060000000000000005, "bed_temp": 55.0, "mesh": "auto"}#
As you can see, this is a JSON encoded file which among other data gives a file_position value (an offset from the start of the file in bytes) at which you need to pick up again. I used vim to edit the gcode. It has an extended command (or is that properly called a script or macro?) :goto( which you only get if you install the full vim, not just the vim-tiny package) which makes this easy. I'm not going to explain in detail how to use vim here, choose your own editor, probably lots of them will show character offset. But I will give a few vim hints in case you decide to dive in with it anyway, or you already use it but don't know these particular tricks.
I copied the gcode off of the printer using ssh. I renamed it first to make this easier. The default ssh password for Forge-X is root.
ssh root@printer-ip cat /data/gcodefile.gcode > gcodefile.gcode<ESC>:goto 49213611 took me to the end of a line of gcode. The next line of gcode is the first print move, but the line we're at the end of is going to be turned into our setup move. So I'm going to the beginning of this line. I inserted ;HERE before it so that I could find it again easily. Use any word you want here as long as it is not in the file somewhere already. The semicolon makes it a comment so that if it's left in the file, it doesn't cause any problems.
I used an article from CNC Kitchen to figure out what to do (as usual, thank you Stefan!) to my gcode file. You should definitely read his whole article, because we'll basically skip right to his step 4 here.
In needed to know some things before I could delete everything between the home command G28 near the top of the file, and the ;HERE marker I put in. (In vim I can easily delete from the insertion point to the marker.)
We need to put some lines into the print to set things up for us before we can restart the print. First M106 to set the fan speed, then some G0 moves (the convention for 3d printers is that G0 is for non-extruding or "travel" moves, and G1 is for extruding or "printing" moves, this affects the speed of moves and possibly other behaviors) and finally a G92 command to set the extrusion amount. So we're going to go backwards through the file to look for these commands, but because I know exactly where the print stopped I don't have to go back to the beginning of a layer.
Here's my gcode, it has the X and Y locations where I stopped as well as the extrusion value:
G1 X-74.49 Y-91.877 E.01267We're going to change this into two lines that look like this:
G92 E.01267
G0 X-74.49 Y-91.877
Now I search back to the prior Z move (vim: <ESC>?^G[01]\ .*Z.*$) and it tells me the Z offset I need to return to. (I got a line with "G1 Z17.4") I'll put a G0 move to a bit above that point before my other G0 move, then I'll do another one TO it after it:
G92 E.01267
G0 Z18
G0 X-74.49 Y-91.877
G0 Z17.4
And of course also go back and find the last M106 which was S255 (maximum cooling fan speed) for me. Here's the total location-resuming gcode that we need to insert between the G28 and our HERE block.
M106 S255
G92 E.01267
G0 Z18
G0 X-74.49 Y-91.877
G0 Z17.4
I've been talking about a G28 code (home all axes, unless you give it arguments of which axes to home) but my printer doesn't actually use that directly because I'm using Forge-X. In fact, my start gcode runs a macro called START_PRINT which includes it.
Note that I am able to home all axes because there is just barely room for my print head next to my print. How can you figure this out intelligently instead of haphazardly like I did? Home only the X and Y axes as stated in the CNC Kitchen article with G28 XY and then look at your printer and see if it seems like you're going to have room. Otherwise you might need to take additional steps I didn't have to deal with here. If I do have this problem again, which would not be surprising at this point, I will probably investigate eliminating the use of the START_PRINT macro and doing a manual wipe.
The START_PRINT macro also normally performs priming before printing, which we need to disable. This sounds like a bad idea (because if the nozzle isn't primed well, you can have lack of extrusion) except that the extruder head is going to crash into my part if I prime. There seems to be a variable "disable_priming" which will prevent it from happening. I'll just do this in the web interface console now:
SET_MOD PARAM="disable_priming" VALUE=1For any printer, you should look at the Machine start G-code in the Printer settings to find out where you need to work in the gcode. For me, the G28 code is in the START_PRINT macro (actually _START_PRINT, as START_PRINT is a wrapper) so given this full start G-code:
START_PRINT EXTRUDER_TEMP=[nozzle_temperature_initial_layer] BED_TEMP=[bed_temperature_initial_layer_single]
M190 S[bed_temperature_initial_layer_single]
M104 S[nozzle_temperature_initial_layer]
SET_PRINT_STATS_INFO TOTAL_LAYER=[total_layer_count]
I look in the gcode and I find this:
START_PRINT EXTRUDER_TEMP=210 BED_TEMP=50
M190 S50
M104 S210
SET_PRINT_STATS_INFO TOTAL_LAYER=381
M104 sets the nozzle temperature, so I'll keep that. M190 is clearly setting the bed temperature, I'll keep that too. The layer number is used for the preview; I am going to keep the total number of layers and just set the layer number with this gcode I found before my ;HERE marker, which we will put right after the TOTAL_LAYER line:
SET_PRINT_STATS_INFO CURRENT_LAYER=173And I inserted my gcode from above right after that, and before my first move. Now this part of the file looks like this:
START_PRINT EXTRUDER_TEMP=210 BED_TEMP=50
M190 S50
M104 S210
SET_PRINT_STATS_INFO TOTAL_LAYER=381
SET_PRINT_STATS_INFO CURRENT_LAYER=173
M106 S255
G92 E.01267
G0 Z18
G0 X-74.49 Y-91.877
G0 Z17.4
;HERE
G1 X-74.49 Y-91.877 E.01267
G1 X-75.046 Y-92.567 E.01579
G1 X-75.922 Y-93.257 E.01986
G1 X-76.682 Y-93.947 E.01828
I also deleted the MD5 code on the first line, because I am using MD5 verification of gcode files. If the MD5 checksum is missing, it will complain, but if it is there and wrong then it won't print.
Then I copied the file back to the printer with ssh:
cat this.gcode | ssh root@192.168.5.183 "cat > /data/restore.gcode"The next step was to heat up the extruder to 210°C and the bed to 50°C (this is silk PLA on a smooth cool plate), home all axes, move the extruder to someplace other than over the part, and extrude some filament, then pluck the excess off of the extruder tip. It's very much not perfect (I'd rather prime against the bed, but I didn't feel like writing the moves to prime it on the area of the bed where it wouldn't crash into my part) I guessed it would also better than not priming at all, and did it anyway. The plastic that was in the hotend had presumably been quite well cooked. Since the hotend functions independently, the cooling fan remained operating when the print failed, so there was no heat creep problem.
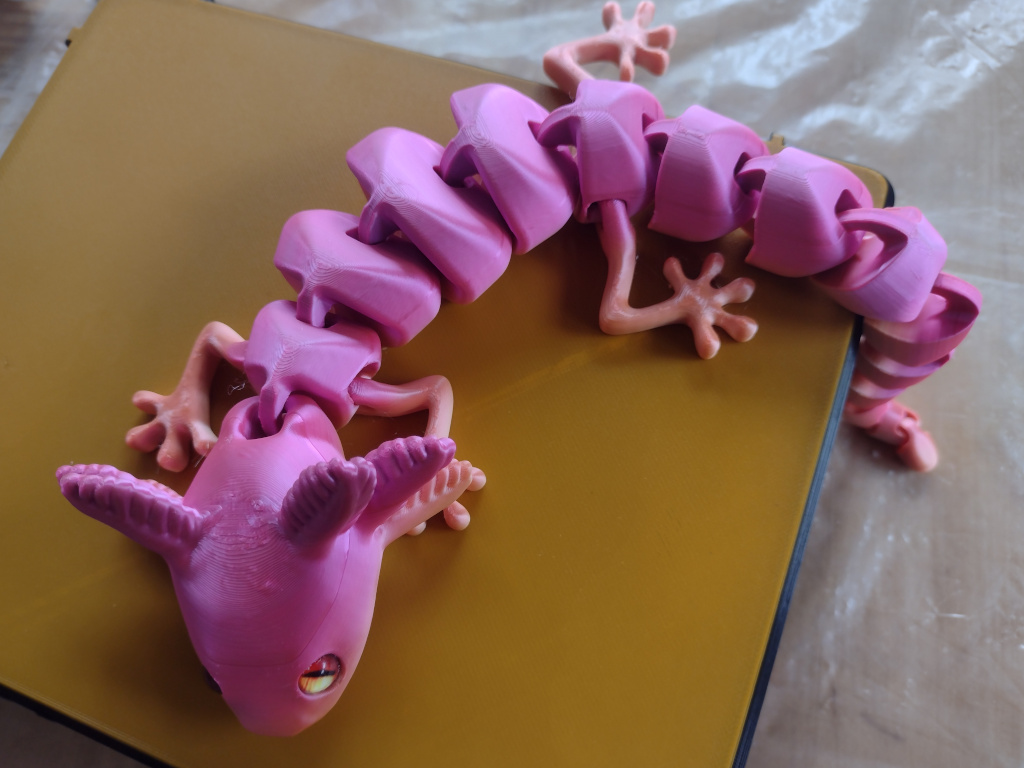
I then ran the gcode, which I had to do from the web interface as the guppy screen refused to acknowledge that the file was printable and... I had remarkable success. What's even more amazing is that I somehow managed not to get any spiders in the infill despite my garage-dwelling printer. I did wind up with a visible line in the print, which is absolutely unremarkable given the fact that silk PLA is known for being finicky. It's an interesting question whether I perhaps ought to have extruded more of it before printing, or if there's some other change I might have been able to make to maintain print quality, but what I don't seem to have is any gaps or overextrusion to speak of. There are some other artifacts I need to work on eliminating, but they are below the point at which the print stopped. This is my first non-calibration print, which I admit was a bit ambitious but I still think within reason.
Anyhoo, say hello to my little friend:
I'll share some other images later which better show the defects from resuming the print (as opposed to the defects from obviously not having this filament fully calibrated yet) when I figure out what's going on with ckeditor and inserting drupal media objects into the content, sigh. It's always something.
When printing is completed, I re-enabled priming:
SET_MOD PARAM="disable_priming" VALUE=0TIL
I learned where Forge-X sticks a bunch of files, I learned how to resume a print from a very specific location, and I learned that in fact the Klipper "tuning" accomplished by Forge-X does not in fact solve the TTC problem. I also learned that people are pretty active on the Forge-X discord. (Navigate to: Forums → mods-and-projects → Forge-X per Forge-X page.)
Which brings us to a point I'm not going to take up in detail here, but I'm very disappointed with having this problem with my printer. These TTC errors can come from a truly stupid range of causes, but the main cause for FlashForge Adventurer 5 users is said to be the CPU not keeping up with demand. The Adventurer 5M and 5M Pro use a dual-core ARMv7 processor which ought to be basically adequate, but the 5M only has 128MB of RAM, and some of it is used for video. Even the Pro only has 256MB, which is an improvement, but not much of one. One potential fix is to replace the internal electronics completely, which is really tempting, but then am I really going to keep the stock extruder head? Because frankly if I'm going to put that much work into the system, I want a higher nozzle temperature and an actively heated enclosure so that I can print more exotic filaments. So then I'm in for a Stealthburner as well. This is probably a $200 project or more, though it does produce a printer with more capabilities than even an Adventurer 5M Pro, and which could reasonably be retrofit to print multicolor as well.
The possible intermediate solution for me is going to be switching from Forge-X to ZMOD, because it allows the use of Klipper 13, which is also supposed to help solve this TTC problem. But this also comes with its own problems. Because Klipper 13 requires more memory, it's necessary to use ZRAM, which is going to add some wear to the flash on the controller. So while I am going to try this out next (perhaps when this print finishes) I am also going to be potentially hastening the need to change the internals...